Warning:
The following information details what I have done to a FAILED sealed battery. I give no indication or approval that the information is suitable for anyone else. Battery contains nasty acid which can burnt your skin or clothing. Short-circuit a working cell can result in fire or property loses. You have been warned.


 Give some life back to a faulty sealed battery

Sealed batteries have a tendancy to fail if left sitting idle on the shelf for sometime. This happens regardless whether they are fully charged or not. Most believe that the failure will come sooner if the battery is left idle in a discharged stage. I myself have had several sealed batteries failed, even after I charged them regularly every few months.


A 12V sealed battery is made up of six 2V gell type cell connected in series. All the interconnection terminals (yellow dotted circles in the photo) are sealed in the battery case.

When failure sets in, the battery voltage drops under light load but returns after the load is removed. No amount of charging can recover the battery. The charging current at normal charging voltage is very small because one or more component cell of the battery have failed into high resistance stage.

Fed up with throwing many batteries away, I tried to break open one 12V sealed battery to see what had happened. It turns out that nothing special can be observed.


The opening of the battery case revealed the inter-cell connection position, marked by dotted yellow circles in the above photo. With this information, more can be done next time a battery failed.

The drilling positions for each interconnection is shown left. To test each individual 2V cell battery, I used a resistor of about 2-3 ohms, a paper clip and a jumper wire.


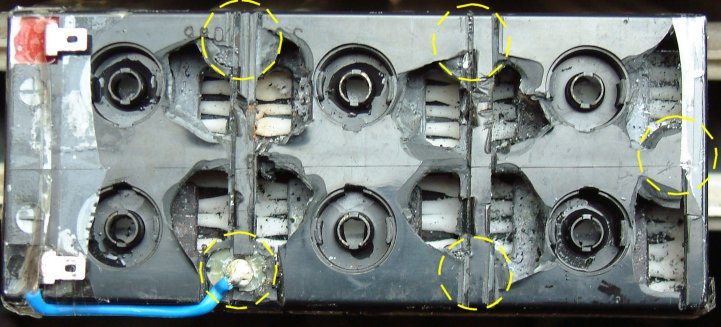
Slowly and carefully drill a hole of depth 4-5mm at position 1 using a 1-1.5mm HSS drill bit. The idea is to access the interconnection terminal. I then stick the end of a straighten paper clip into the hole and measured the voltage between the paper clip and either the positive or negative terminal. With the voltmeter still connected, the load or resistor is applied across the measurement point. If the voltage reading falls only a little, this part of the battery is good. After finding out which three series cells of the battery is faulty, drill another hole on the faulty (3 series cell) path and repeat the procedure. The figure above showed the drilling sequence if one of the top 3 cells are faulty.

Well the idea is to find the failed cell, and drill as few holes as possible. If more than one cell have failed, the battery is not worth furthur effort and can be discarded. When I find the failed cell, I enlarge the two holes across the failed cell using a 2.5mm bit. Using a 3mm tap, I carefully thread the hole and screwed in two 3mm copper screws. Using the highest current range of the multimeter, I measured momentarily the current between the two copper screws and confirm zero current is flowing. A jumper wire soldered to the screw tops complete the battery circuit and allow the battery to function at 10V. Remember not to connect the now 10V battery to a 12V battery charger.

Seal all holes and around the screws with sealant afterwards.