First created:12-Dec-2000 Copyright Lim Chung
TOOLS - What you'll need:
SKILL - How to do it
What type of soldering iron is needed? What style - Pencil type or pistol type? Do you need an expensive temperature controlled iron along with digital display? Well, the choice is yours. But I found it only reasonable to spend the extra cash for an expensive iron after you have learned and mastered the skill of soldering.
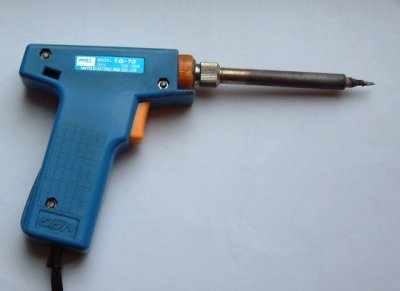
From my own experience, I have been using a Japanese made GOOT 20W/200W dual-power iron with "iron-clad" tip for many years. This soldering iron has a pistol shaped body and a neon power indication lamp. It uses ceramic heater element and I found the tip do not become overheated even after being left for several hours unattended. If I required extra power in order to solder larger component parts, 200W is instantly available by pressing the trigger. The shape of its tip is like a sharpened pencil, which I found easy to use and allow me to solder properly on fine ic circuits. Tip shape has a personal favour to some extent.
Note: Avoid soldering iron with plain copper tips as the tip's surface will soon got "eaten" by the solder and have to be filed or replaced.
For serious hobbyists, buying a really good soldering iron is inevitable in the later stage of the hobby. I have bought a "WELLER" temperature regulated iron as my Xmas present years ago. The temperature regulation is purely mechanical. A magnet attached to the tip of the iron cycles pass its currie point when it is too hot, which activates a magnetic on/off switch to control the power to the 24V a.c. heating element. The Weller is beautifully designed with flexible heat resistance silicon supply cable and in my view the best iron I can own. No fancy temperature control dial or temperature display, only a small distinctive clicking sound as the iron cycles on and off.
Oh yes, I have had one of those heavy gun type "shorted turn" transformer
soldering gun in my early years. Still remembered having the hot transformer resting on
the back of my palm as I held the gun while I tried solder those projects on valves.
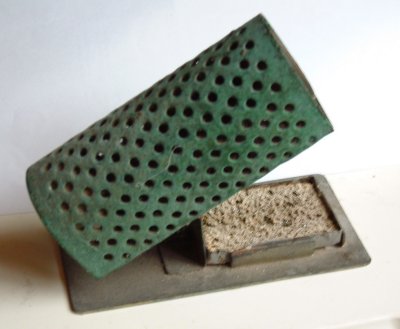
A hot soldering iron is a nasty thing to touch. It could start a fire if left in contact with other combustible material. So you need a good, heavy stand to hold the iron when it is hot but not being use. There are, again, many different types.
I settled for the type using metal enclosure with a large opening and lots of ventilation holes on top. I had accustomed to the practice (and you too will eventually) of grabbing or replacing the soldering iron from its stand without even looking. Large opening is a much easier target for me to replace the iron.
The stand has a shallow tray at the base for a tip cleaning sponge. You need a gap between the sponge edge and the tray edge such that you can remove excess solder left on the tip by scrapping it across the edge. A large hole in the sponge will also serve the purpose.
If you like those stands which resemble a "spring", choose those designs with concentric springs so you won't hurt yourself by touching the outer spring. A sponge is an absolute requirement and it has to be 'very damp' (but not soaking wet) in order to work properly. I use a plastic oiling bottle to squeeze water onto the sponge as needed, saving me taking the sponge to the kitchen sink.
Nothing special in this category. Just use rosin fluxed 60% Tin and 40% lead alloy.
These come in several diameters with 20-22SWG being a popular choice. These are sold by
weight.
A knife or scrapper is an essential part in soldering those components whose leads have
tarnished because of years of unused. In other times you need them to remove the green or
blue protective coating on printed circuit board to make a proper joint.
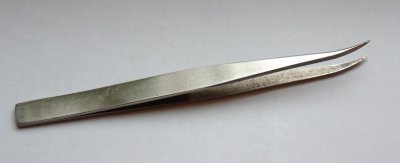
A very useful hand tool in soldering and de-soldering components from PCB. Look for the
stainless steel made and a bent 'hook' shaped tips. For some straight ones it might be
possible to bend the tips to form a hook shape. When one wants to remove a component, say
a resistor, put the hook shaped tip on one end of the resistor and heat the solder side
with the iron. Pull the end away from the board when the solder melted. Do the same for
the other end to remove the resistor. To enable new component be fitted, the original
holes for the resistor on the board can be "found" by poking one end of the
tweezer into the melted solder which cover the hole and keeping the tweezer steady until
the solder cools.
A spring loaded pump where you charge the spring via a level before each use. It is a
simple pump working in the reverse direction. When you want to suck some solder, you melt
the solder and place the sucker tip on the joint, then release the trigger. In early days
the lever that charge the spring can suddenly extend and hit one on the eye or chin when
the trigger is released. This type of design was dangerous and now not seen anymore. Buy
those design that enclosed the moving level which offer no possibility of personal injury.
The theory is simple. To have a good solder joint by hand, you will have to ensure that:
The first requirement is easy. You remove any oxide by lightly scraping the knife left & right on a component lead while gently rotating the component to obtain a clean finish on tarnished lead. Most hobbyist can perform this operation very well.
The second & third requirement is a bit tricky and where most of the problems occurred. Let us take it in steps. You will find that initially you need 3 hands to do it properly. (sighed!)
If you applied too much solder to a joint, say on a printed circuit board, you can remove the excess solder by the following method. Heat the solder until it melts, with the iron still touching the board, tilt the board up and move the tip of the iron slightly until solder flows along the tip towards the iron. You can get rid of excess solder on the tip by scrapping on the sponge.
However, removing solder on a soldered component with more than three leads is much more difficult. You need a solder sucker/pump to suck up the solder first. It sounds obvious but I bet beginner will be surprised that an IC would sit still even after a total of 14 or 16 sucking operations on the pins using the sucker. The problem might be one or all of the following.
Firstly, you do not, as according to common sense, heat the joint, remove the iron and apply the sucker. You must heat the joint, without moving the iron and use the sucker on the joint.
Secondly, even the joint looks clear of solder, there might be solder sticking the component lead to one side of the plated-through hole. You can often break this bonding by pushing the lead to the opposite side of the hole, in a direction at right angle to the axis of the hole using a small flat blade screw driver. You can hear a distinctive click when the bond is broken. If the lead bends instead of moving, the only way is to apply solder to the joint, and repeat the solder sucking operation.
Thirdly and the most frustrating case is a large copper area on the component side of the board and a tight hole clearance of the component lead. There is no chance that heating from underneath can melt the solder on the component side of the board. In this case I did heat the lead from the component side and suck via the solder side. A very difficult act to perform though.
Have you mastered the skill of soldering?
Self Test: using a soldering iron and your hands only
Task 1: Join two ends of a 4" solder cord to form a ring
Task 2: Join the ends of 3 pieces of solder cord to form the letter "Y"
The above tests are meant to be fun. Do not take the result seriously. With practice
you can do them effortlessly.